
Hosting a static website on AWS S3 with CI/CD
In this article we will discuss the step by step process on how to host your static website on AWS.
Getting Started
You are expected to have a AWS account to continue with this tutorial, If you don't have one, create one! It is ideal to create a AdminRole and create projects within that instead of your ROOT account. This playlist from Tiny Technical Tutorials will help you in that.
I believe you have basic understanding git, web technologies!
Now Grab your popcorns and let's start.
Let's Create a Github Repo
If you already have a github repository where you store your website files, you can go ahead with that, else take a spoon and start feeding 😅
run
npm create vite@latest aws-app -- --template vanilla-tson your terminalnow type to terminal
cd aws-appand go to the project directory ,now install dependenciesnpm install, start dev servernpm run devYou web-app should be available at
http://localhost:5173/Now let's push this to Github, Now we are ready to move on to next steps
Uploading files to S3
If you are unfamilar with s3 please go through tutorial series and develop some basic understanding. Simple Storage Service (Amazon S3) is an object storage service that can store almost all types of files. we will be using Amazon S3 to host our static website.
Navigate to the project folder and run
npm run buildon your terminal.You should see
distfolder getting generated. we will be using these build files for our website.Navigate to S3 and create the bucket with the domain of your website, we will be using webapp.hstart.in as our domain so we will create a bucket named
webapp.hstart.into differentiate it better, you are free to name it the way you want, go with default options and create bucketnow navigate to S3 bucket and upload your files
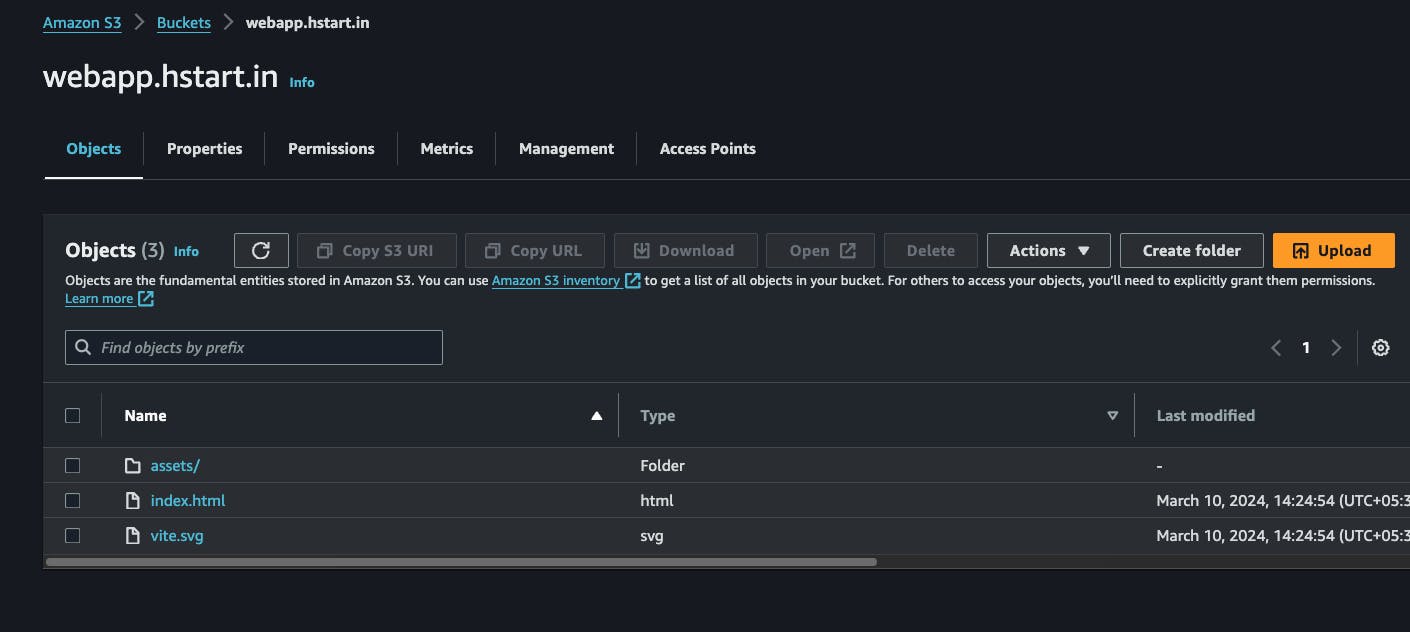
Now navigate to
propertiestab and scroll to bottom to find static website hosting, click on edit, and let's enable it, and save changes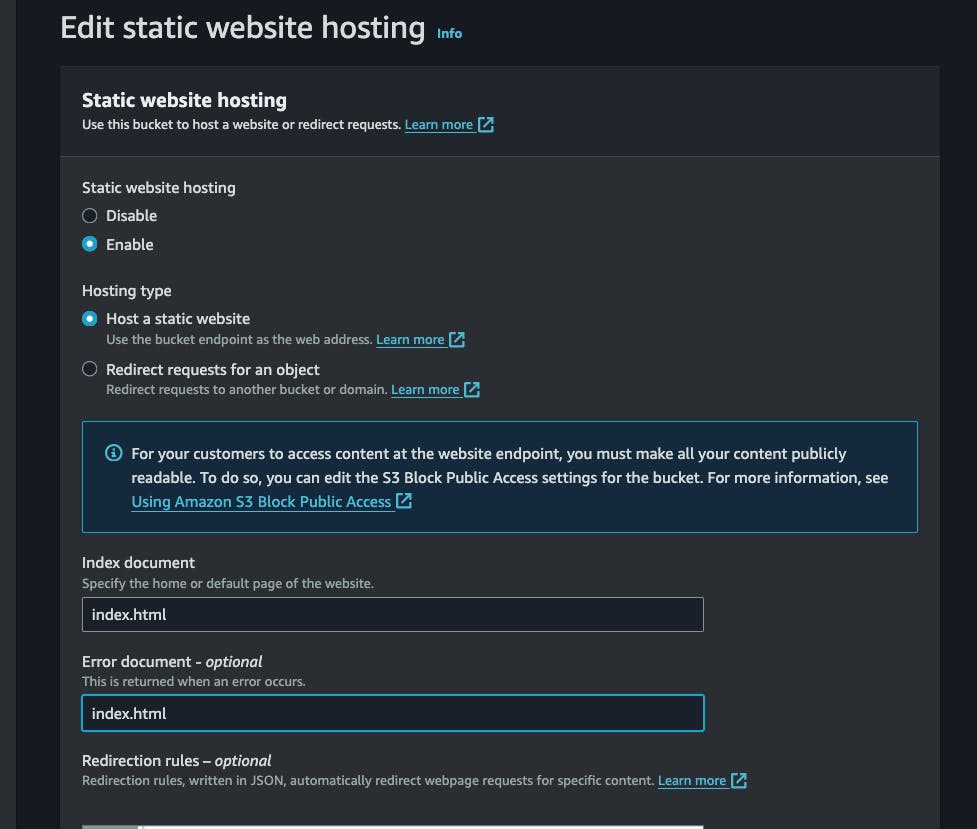
Although we have enabled, static website hosting, because we have blocked all public access during creating a bucket (default option), it cannot be accessed from outside, let's enable all public access.
click on
Permissionstab and click on edit to the right of Block public access (bucket settings), uncheck the box, and save changes, confirm the dialog.
Although we have enabled public access, if try to access the object from a browser using objectURL because we haven't attached a public access policy, website will show access denied error,Don't worry we will fix that soon.

Navigate to
permissionstab again and click on edit beside the bucket policy and add the following policy, make sure to change the bucket name on your policy, this will allow all the public to get the object/file from s3 bucket you defined.{ "Version": "2012-10-17", "Statement": [ { "Sid": "PublicReadGetObject", "Effect": "Allow", "Principal": "*", "Action": "s3:GetObject", "Resource": "arn:aws:s3:::webapp.hstart.in/*" } ] }Now you shouldn't be getting Access Denied error that show above, you should be able to access the objects/files from the objectURL of each file, this is what showed up when i tried the objectURL of js file within the dist/assets folder, we can see all the contents inside the js file.
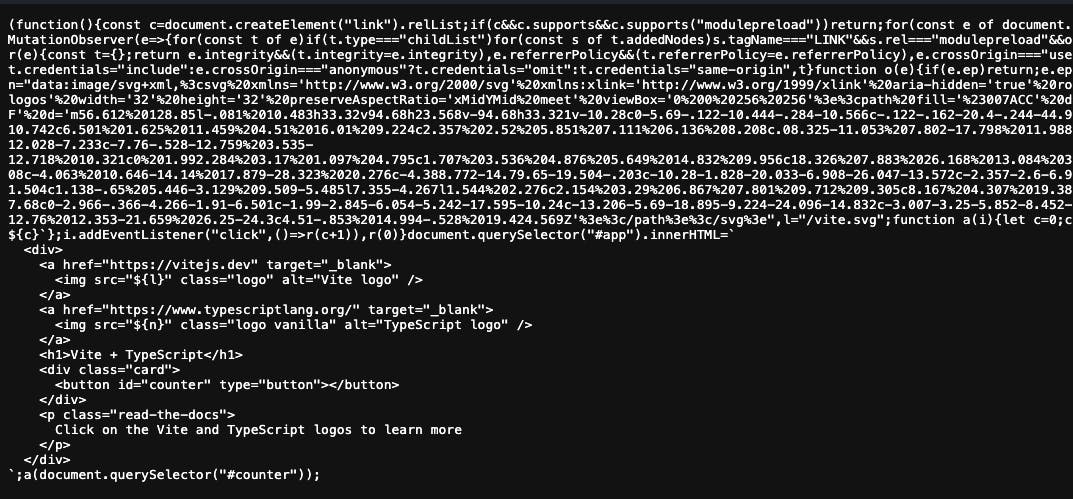
Everything seems to be configured correctly, still, why isn't it showing up as a website, this seems to be of no use. Don't worry, it will get fixed as we add cloudfront, SSL certificate to the mix.
Setting Up the Cloudfront
Cloudfront is the CDN that we are going to distribute out website content across the globe, It will reduce the latency for our users by storing a replica of our website content closer to the users who frequently access our website. Let's navigate to cloudfront, start configuring it.
click on create distribution
In the origin domain input select your s3 Bucket, once you select the bucket it will give the below warning, as we are intend to use it for static website hosting, click on use website endpoint , otherwise hosting will not work properly.
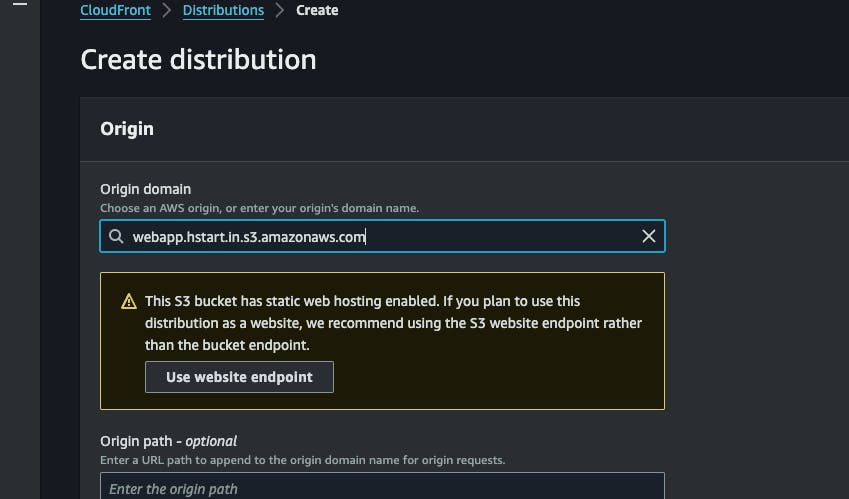
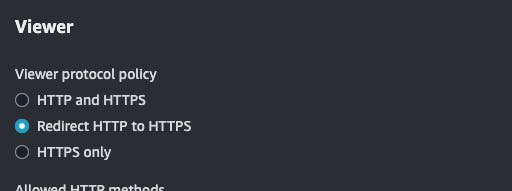
select redirect http to https
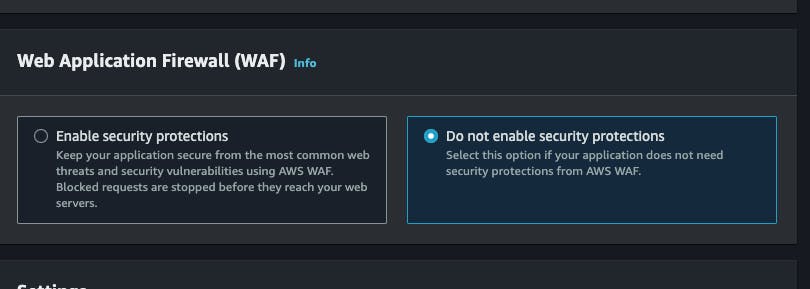
Disable Website Application firewall for now
As I intend to use it with a subdomain of my own, I will be adding an SSL certificate, As we do not have a certificate for the subdomain , we will have to create it. Under Settings section, click on
Request Certificatelink , just below the Custom SSL Certificate Input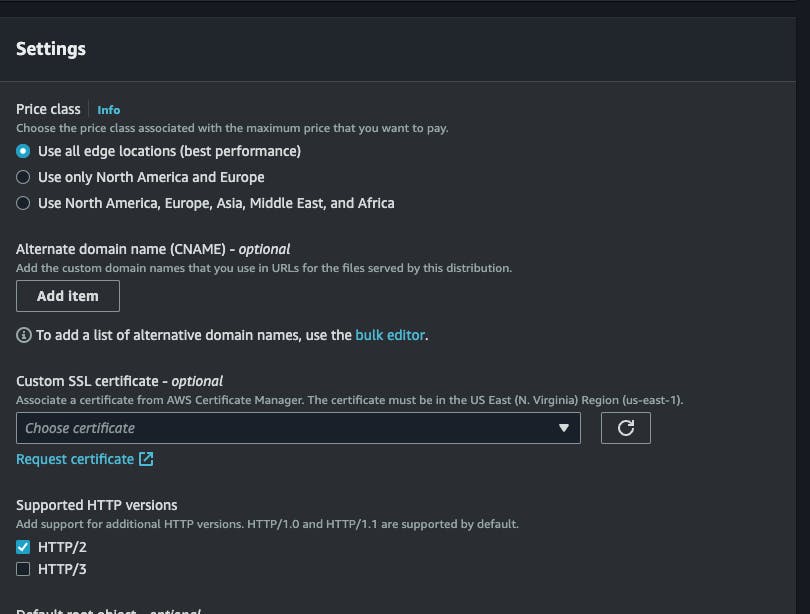
It will open AWS CERTIFICATE MANAGER on another window
Make sure the location were you create certificate is US EAST (N. Virginia) Region (us-east-1), The Location will get automatically selected when you naviagte to AWS certificate manager, for some reason it doesn't, select us-east-1 region from the navbar and create the certificate
select
request a public certificateand click on next
Add both www and non-www version of your subdomain, leave everything else on default, and click on
request certificate
now click on the
certificatethat is being issued, then click oncreate records in route 53, then confirm it, if you do not have a hosted zone in route53, you may need to create it first. Hosted zone is a paid service, it will cost around 0.6$ including tax per month to have one. this is where you set up the domain you have purchased. If you need a tutorial on how to set it up, let me know in the comments.
Now comeback to our cloudfront tab (remember new tab got opened when we clicked on request certificate), click on refresh button beside the input, then select the certificate you just created.
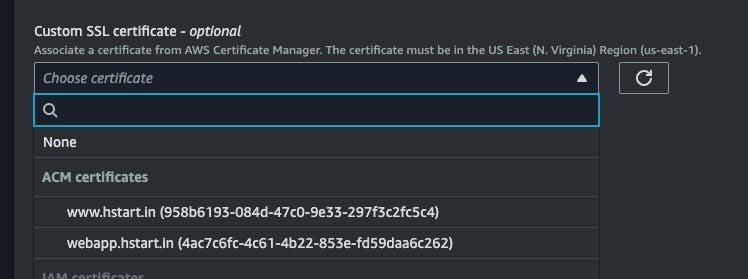
Additionally you can add Alternate domain name , which is optional, settings section should look like this after you have done with all, keep everything else default, and click on
create distribution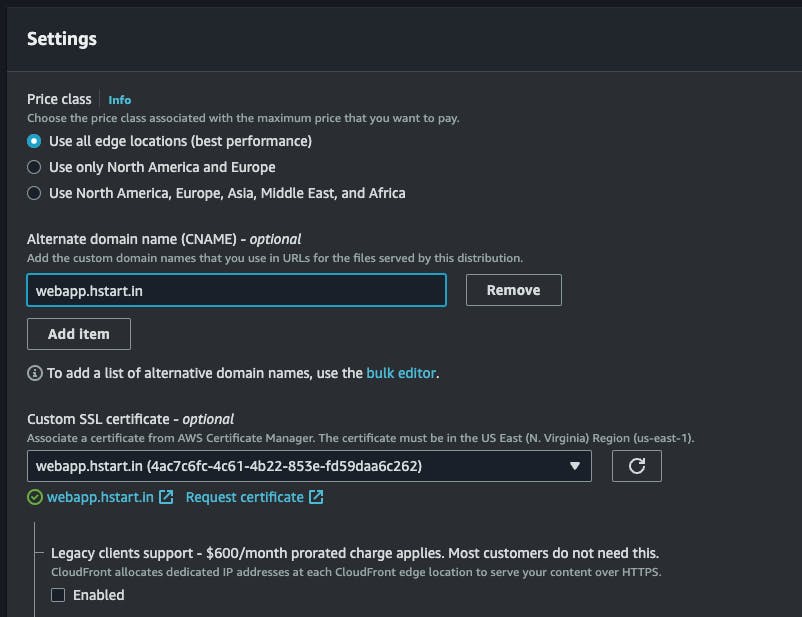
Now you'll be able to see your new created distribution

Setup invalidations, we need to invalidate cloudfront cache once changes happen inside our S3 bucket, Navigate to your distribution and click on
invalidationstab. click on create invalidation, then add/**/*to the input field, this will trigger invalidations for changes inside the subfolders too. then click oncreate invalidation.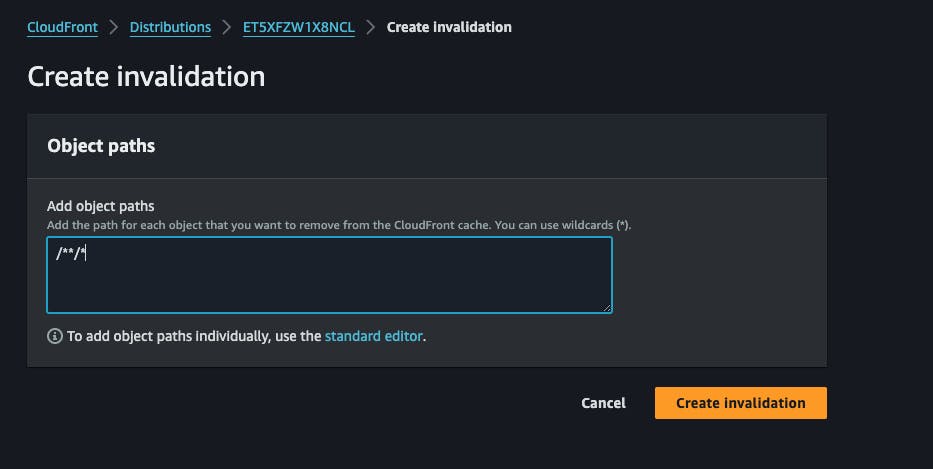
Now copy the domain name from the distribution and try to access the address from your browser, Viola! your app is live on cloudfront

Setup subdomain
Although we have created certificate for our subdomain an all, route53 still doesn't know where to route the DNS queries coming to http://webapp.hstart.in/ so we need to set it up.
Go to route 53 then navigate to your hosted zone.then click on
create recordAdd your subdomain, select Record type A as shown in the image, toggle on Alias , Select
Alias to cloudfront distribution,then select newly created distribution from the dropdown, thencreate records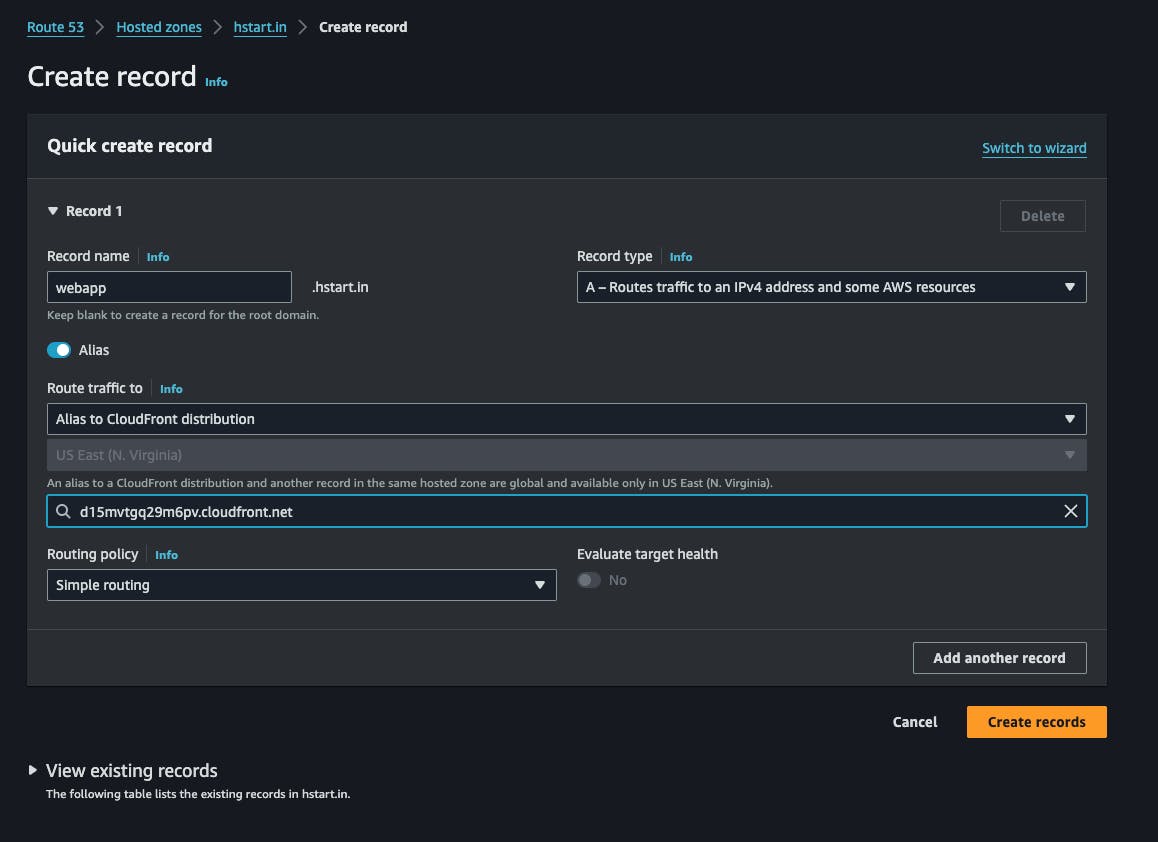
It might take few minutes, our website is now live on webapp.hstart.in , Yay 🎉.
Re-routing www domain request to non www version.
People tend to add www before a web address, if we haven't set up this up, they might get DNS error, as we already have non-www version of our website up, now we will try to route www requests to non-www version of our website.
As we already have a bucket with non-www version we will create a bucket with www version and route the requests to non-www, It is also possible to do it vice versa, it is your choice how to set it up.
let's create a bucket with
www.webapp.hstart.inname , as we did the last timeAs we did last time navigate to newly created bucket and go to permissions and deselect Block public access (bucket settings) and save changes
we will use this bucket to redirect queries to our main bucket, so we don't need to add any public access policy, nor we need to add any files to this bucket.
Go to properties tab, navigate to
static web hostingand click on edit, click on enable, then selectRedirect requests for an object,add host name (the domain where we want to redirect requests) then choosehttps, save the changes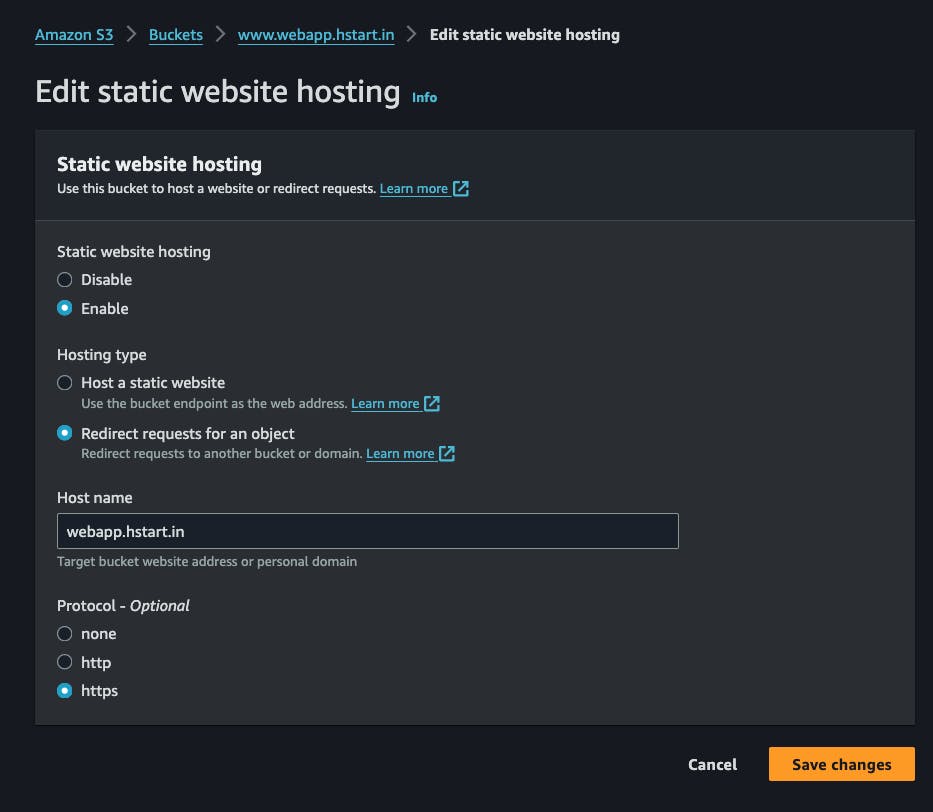
Now go to cloudfront and create a new distribution that points to our newly created S3 Bucket, you can use the SSL certificate that we have created early, as we have added both www and non-www domain name versions of our website to the certificate
once the coludfront distribution is created, go to route 53 and point webapp.hstart.in requests to the newly created distribution. same as we did before.
now https://www.webapp.hstart.in/ as well as https://webapp.hstart.in/ will resolve to https://webapp.hstart.in/ , Great! Our website is live and well
CI / CD
How did we start? uploading files to S3, this is definitely not the ideal way to do things, manually building project, uploading files manually to S3 is not a sustainable solution. now we will introduce codebuild, code pipeline to make our deployment process fluid.
Our goal is to use codebuild to build our app and replace the files inside s3 with newly built files whenever we push new changes to our main/master branch. Let's integrate it.
Go to codebuild and click on create project
choose project name of your choice, i chose "webapp"
Select your source provider, I use GitHub to host my code so i select Github, if you haven't connected to github before you may need to connect and authenticate your Github using a personal access token, once you have connected to github you'll be able to select your project repository from the dropdown

add the name of your main/master branch to
source versioninput
when we create this codebuild, a new role will get created for this project. we will attach necessary permissions/policies this particular role. policies gives resources permissions to make changes on other resources. As i already mentioned, codebuild need to modify objects(files) inside our s3 bucket each time a new build happens so that whenever code changes, it will get reflected on our website.

we will be using a buildspec.yml file to handle the build process, so select
use a buildspec file. we will add buildspec.yml file to the root of our project
This is how out buildspec.yml file looks like, let's add this to root of our project and push it to github, make sure you change s3 bucket name to your s3 bucket name.
  version: 0.2

  phases:
    install:
      runtime-versions:
        nodejs: 18 # Change this to match the version of Node.js you're using
    pre_build:
      commands:
        - npm install # Or any other command to install dependencies
    build:
      commands:
        - npm run build # Or any other command to build your static site assets
        - aws s3 sync ./dist/ s3://webapp.hstart.in --delete # Sync static site files to S3 bucket
    post_build:
      commands:
        - echo "Build completed successfully"

  artifacts:
    files:
      - '**/*'
keep everything to default and create project
Now go to your codebuild project and create a build. The build will get failed as codebuild don't have necessary permissions to work with. You can read the issues within the build log, we need to proceed accordingly. Don't worry, we will fix it soon.
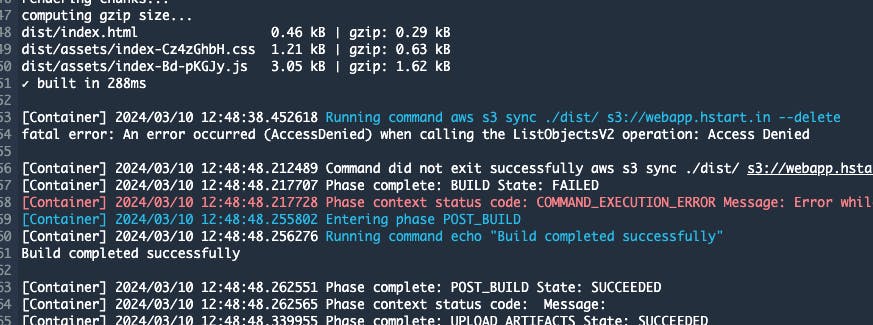
Navigate to
IAM-->rolesand find the role that just created by codebuild, you'll see a policy under the role in the permissions tab, click on it.
You'll see code build already created some policies automatically for s3, but some permissions are missing, we also need to specify the s3 object where we stored our website files. It is always be better to specify buckets considering security, give permissions that are needed, nothing more, nothing less
click on s3, then click on Edit , I added
Delete Object Put object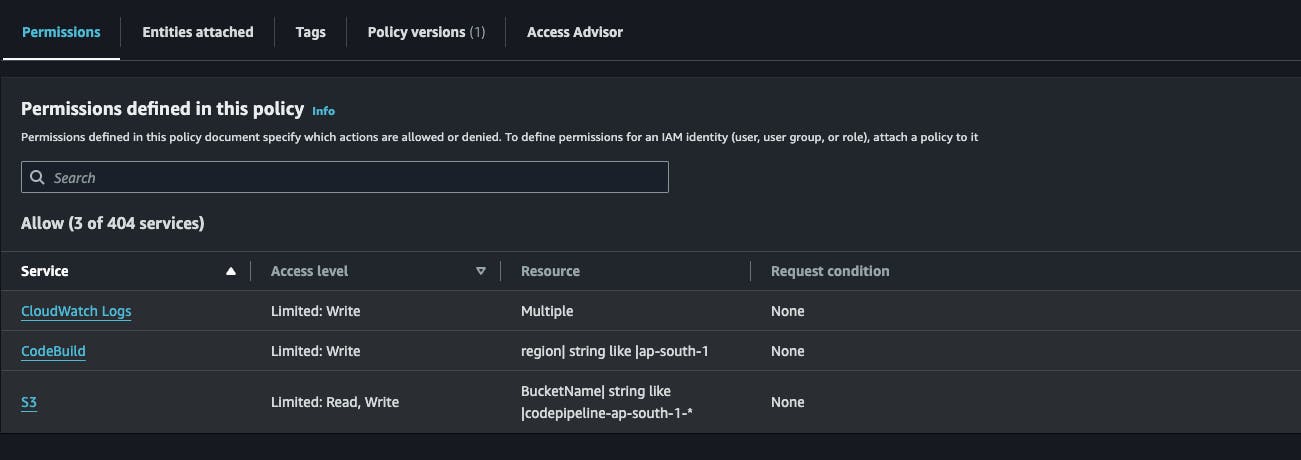
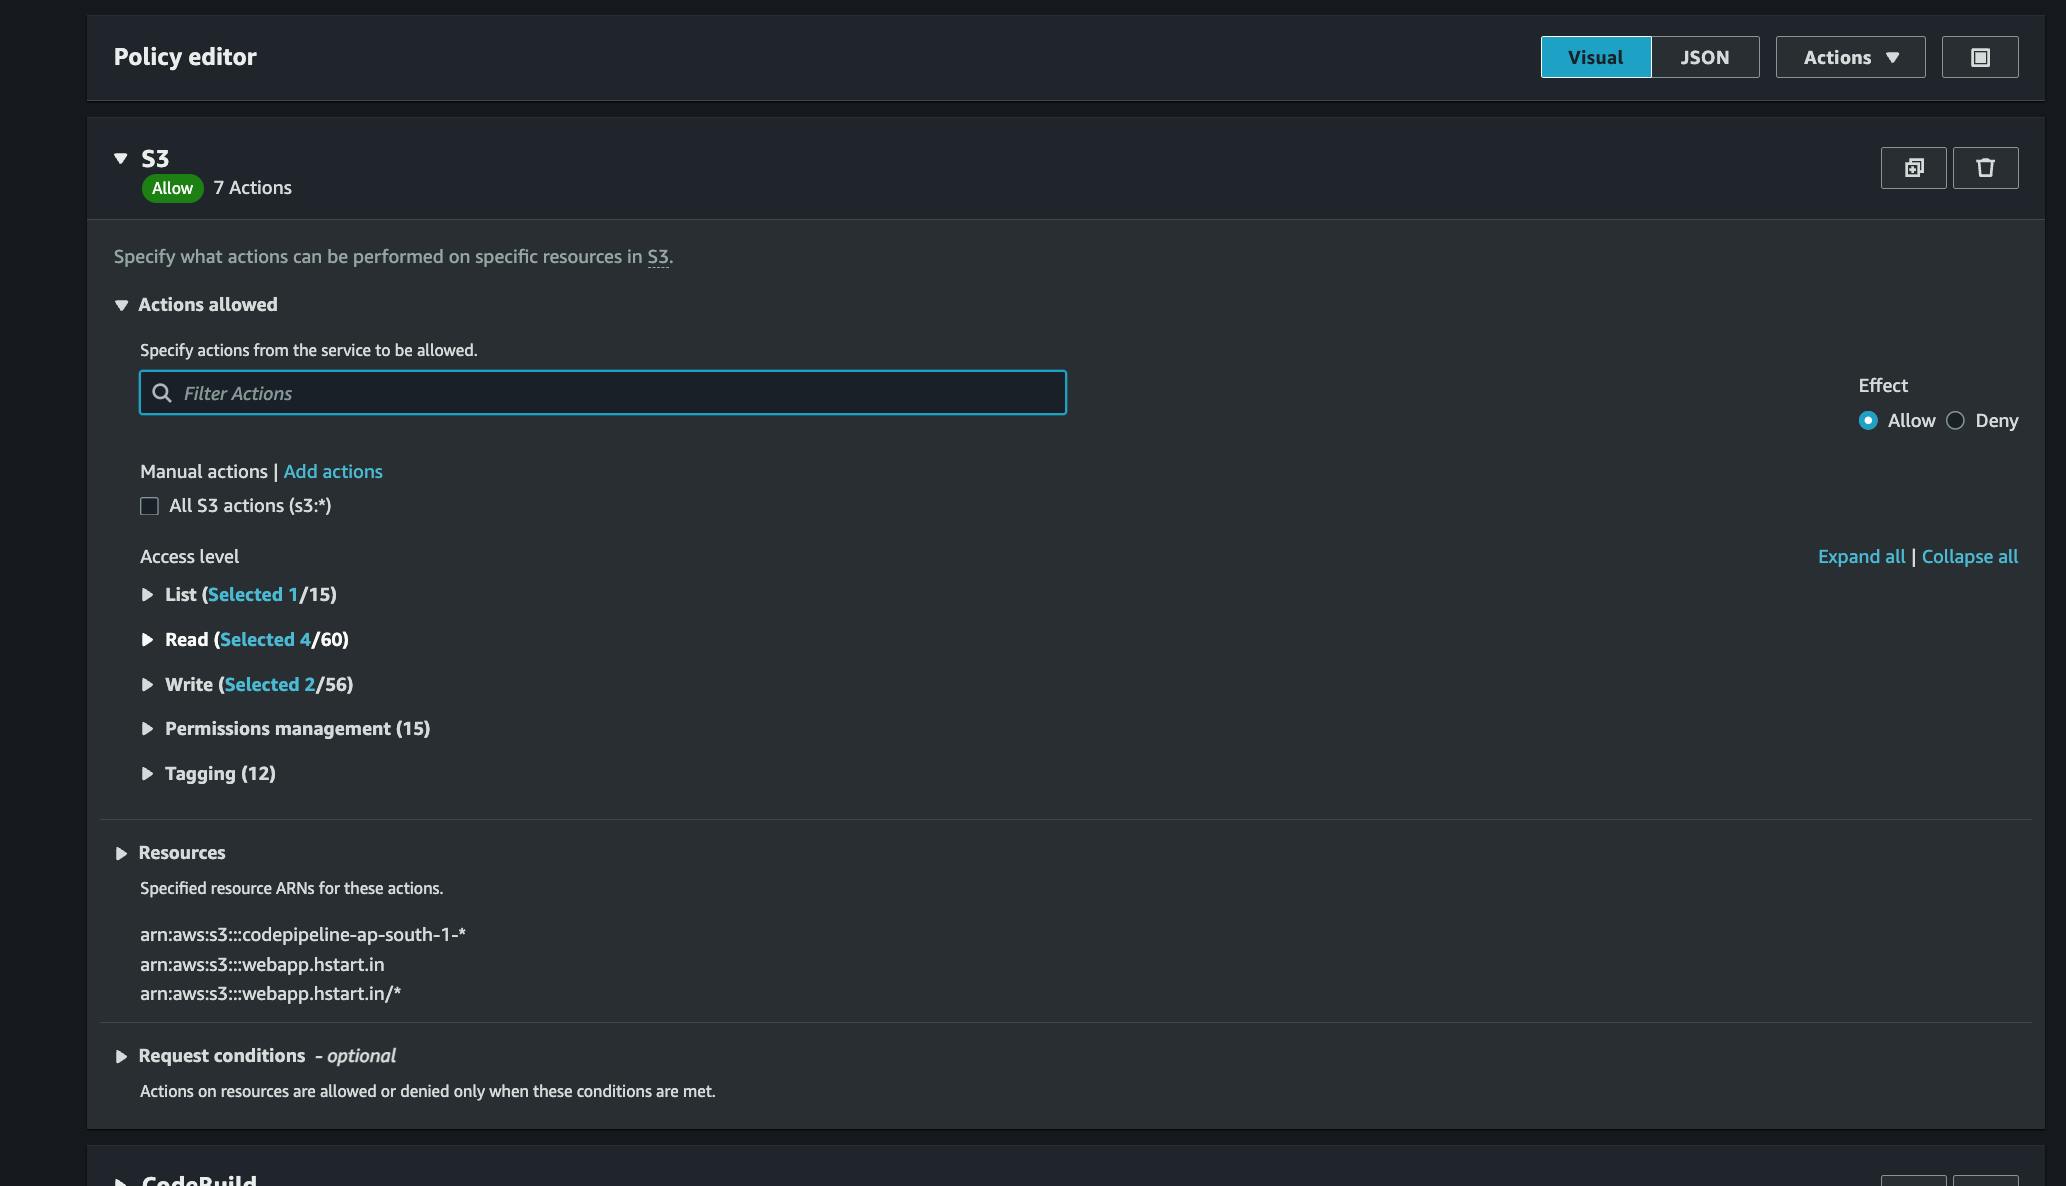
Delete Object,List Bucketpermissions additionally to the policy, you can use visual editor to make those changes.
add Delete Object , List Bucket permissions they can be found under Write, List sections respectively,
Also under Resources section you need to add the arn of your S3 bucket, also same arn with /* to select all the objects inside. it is better to select JSON editor and add these lines inside the resources object
arn:aws:s3:::webapp.hstart.in
arn:aws:s3:::webapp.hstart.in/*
The final policy should look similar to this, we only added 2 extra permissions in the Action array , 2 lines under resources array, everything else is created by codebuild.
{
    "Version": "2012-10-17",
    "Statement": [
        {
            "Sid": "VisualEditor0",
            "Effect": "Allow",
            "Action": [
                "s3:ListBucket",
                "s3:GetBucketAcl",
                "logs:CreateLogGroup",
                "logs:PutLogEvents",
                "codebuild:CreateReportGroup",
                "codebuild:CreateReport",
                "s3:PutObject",
                "s3:GetObject",
                "logs:CreateLogStream",
                "codebuild:UpdateReport",
                "codebuild:BatchPutCodeCoverages",
                "s3:DeleteObject",
                "codebuild:BatchPutTestCases",
                "s3:GetBucketLocation",
                "s3:GetObjectVersion"
            ],
            "Resource": [
                "arn:aws:codebuild:ap-south-1:343391345253:report-group/webapp-*",
                "arn:aws:logs:ap-south-1:343391345253:log-group:/aws/codebuild/webapp",
                "arn:aws:logs:ap-south-1:343391345253:log-group:/aws/codebuild/webapp:*",
                "arn:aws:s3:::codepipeline-ap-south-1-*",
                "arn:aws:s3:::webapp.hstart.in",
                "arn:aws:s3:::webapp.hstart.in/*"
            ]
        }
    ]
}
Once we are satisfied with policy, click on next , then click on save changes , make sure that the policies are saved properly.
Now navigate to codebuild and retry build, it should be successful now

Now we can create build, with a click on a button, we still need to login to AWS, navigate to codebuild, and click on start build to release a new version of our website, we are too lazy for that. Let integrate codepipeline, and automate the codebuild process whenever we push to our main/master branch.
Setting up code pipeline
- Navigate to code pipeline, click on
create pipeline, we will choose v2 as we can create as many pipeline as we need without incuring additional cost. Also it will automatically create a new role so that we can add permissions later if needed. Once everything good click on next

Here you will need to connect to github, click on connect to github, give it a name, click on install github app, allow permissions from github, it is pretty straight forward, you should be able to do it. If you are stuck at this, do let me know. once the connection is successfully established you should see following screen

Now specify a trigger to start a build pipeline, we will set it to on push to our main branch, now click on next
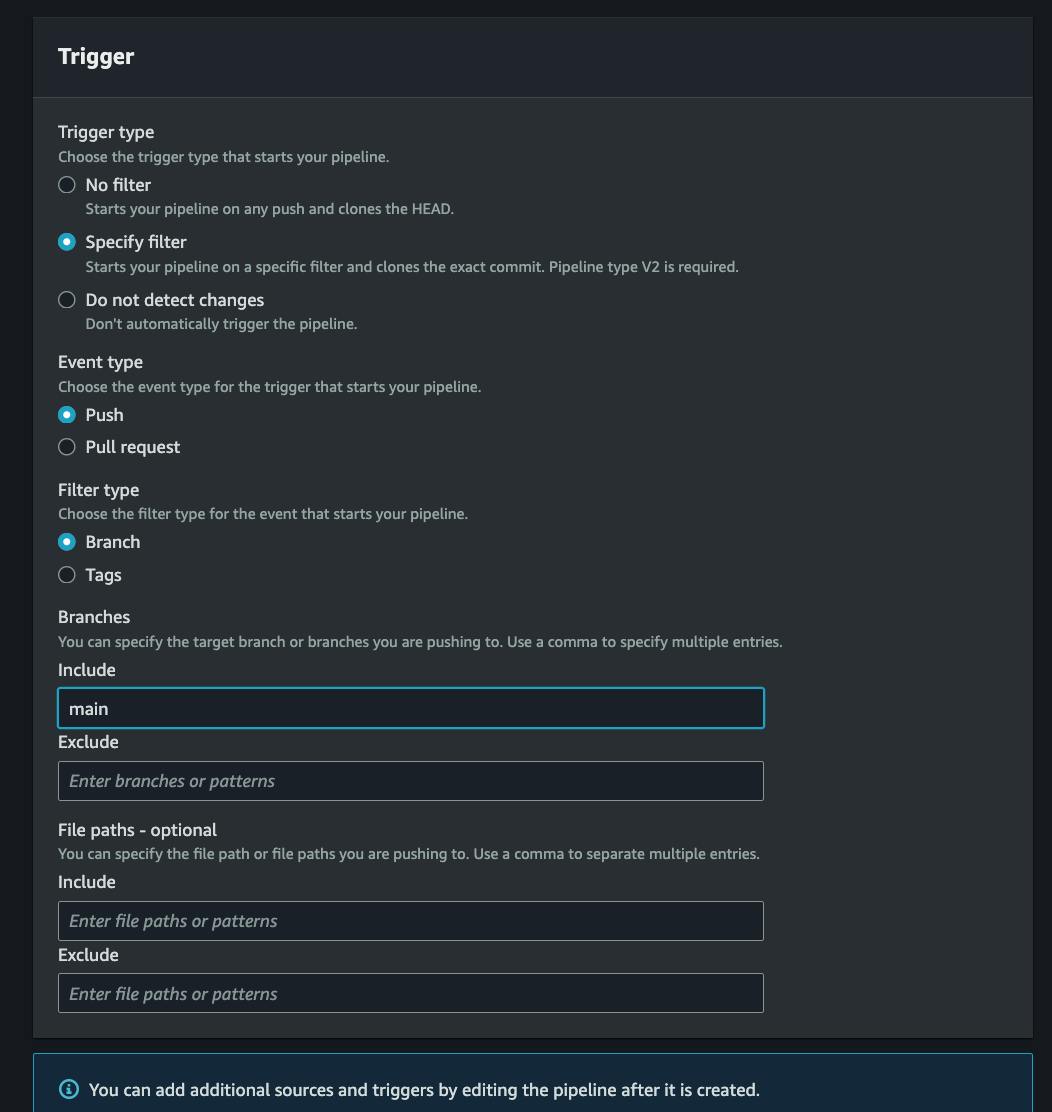
Now we need to connect our code pipeline to the codebuild project we set up earlier, select AWS codebuild as our build provider, then select the project we created. If you have any Environment variables, that are being used in the project, you can add them at this step, you can add add them later too as you need. Once everything is good, click on next.

We can skip the deploy stage by clicking on the
skip deploy stagebutton as we don't need it for our project.Then click on
create pipelineto finish creating the pipelineIf everything went well, you should see succeeded message, you can click on
release changeto release a new change.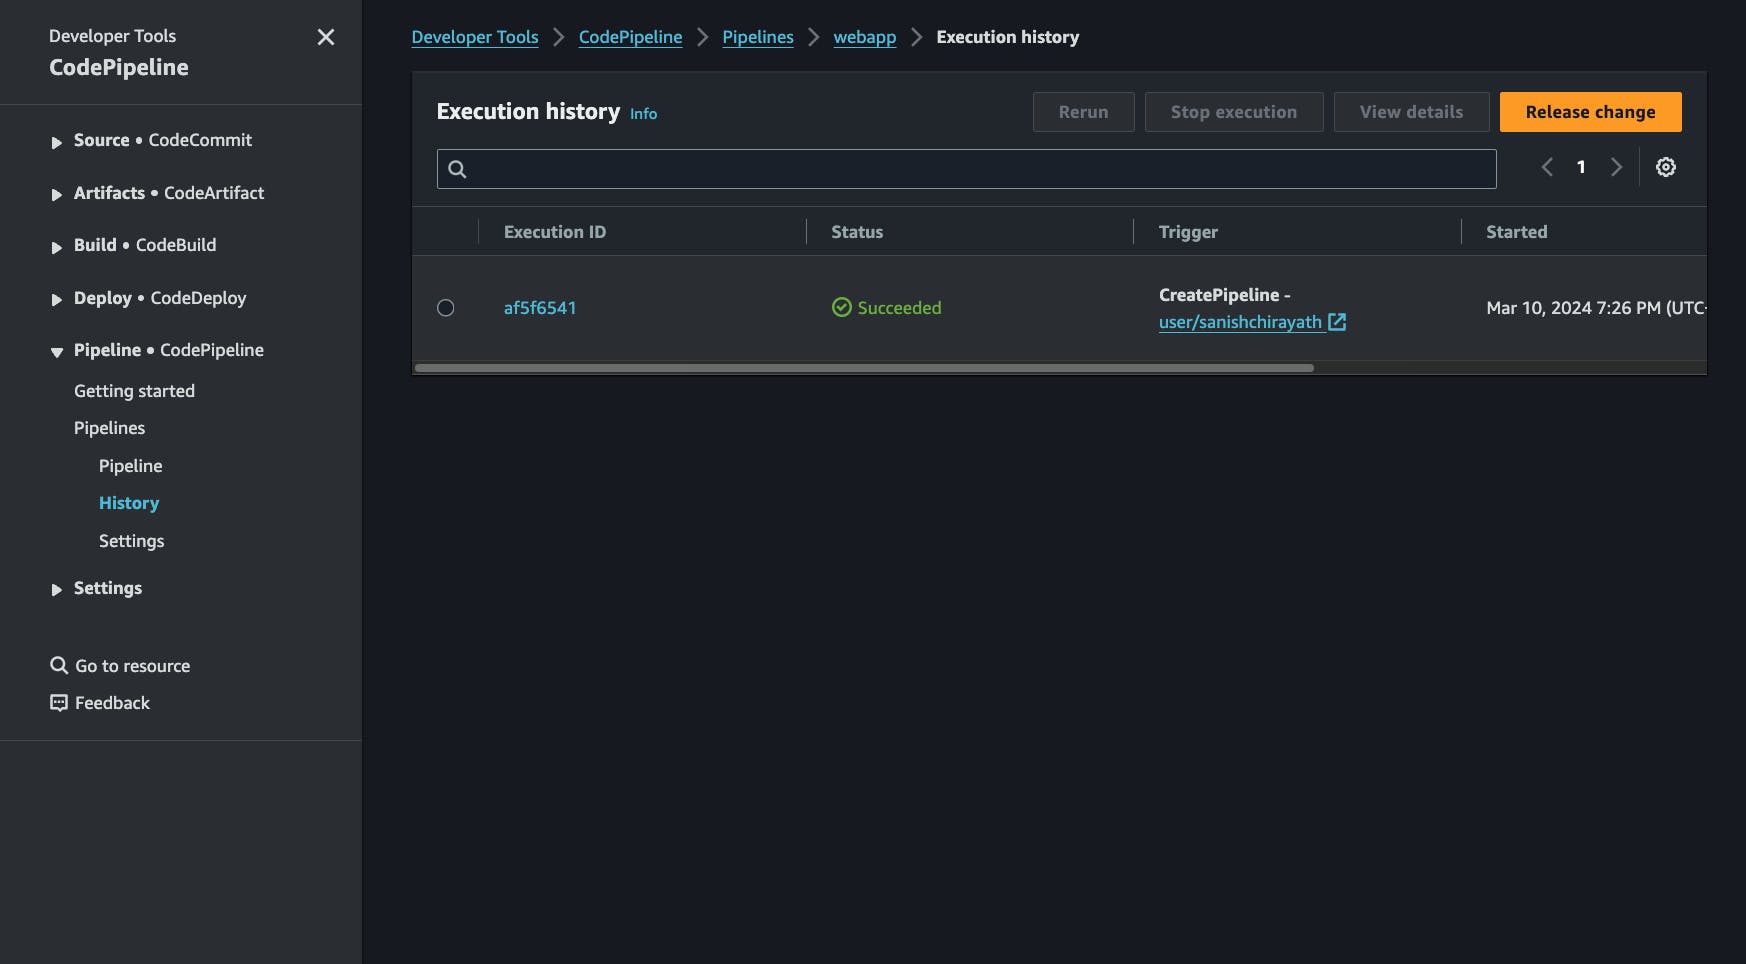
Now our CI/CD pipeline is finally ready, if you push changes to your main branch and the changes will get reflected on the website. Try making changes.
Extras
While I was working on this, I noticed the cloudfront cache is not getting invalidated somehow, So I decided to force the invalidation in the post build process, new buildspec.yml file is as follows
version: 0.2

phases:
  install:
    runtime-versions:
      nodejs: 18 # Change this to match the version of Node.js you're using
  pre_build:
    commands:
      - npm install # Or any other command to install dependencies
  build:
    commands:
      - npm run build # Or any other command to build your static site assets
      - aws s3 sync ./dist/ s3://webapp.hstart.in --delete # Sync static site files to S3 bucket
  post_build:
    commands:
      - echo "Build completed successfully"
      - aws cloudfront create-invalidation --distribution-id ET5XFZER5THY --paths '/*' #invalidate the given cloudfront distribution

artifacts:
  files:
    - "**/*"
{
    "Version": "2012-10-17",
    "Statement": [
        {
            "Sid": "VisualEditor0",
            "Effect": "Allow",
            "Action": [
                "s3:ListBucket",
                "s3:GetBucketAcl",
                "logs:CreateLogGroup",
                "logs:PutLogEvents",
                "cloudfront:CreateInvalidation",
                "codebuild:CreateReportGroup",
                "codebuild:CreateReport",
                "s3:PutObject",
                "s3:GetObject",
                "logs:CreateLogStream",
                "codebuild:UpdateReport",
                "codebuild:BatchPutCodeCoverages",
                "s3:DeleteObject",
                "codebuild:BatchPutTestCases",
                "s3:GetBucketLocation",
                "s3:GetObjectVersion"
            ],
            "Resource": [
                "arn:aws:codebuild:ap-south-1:343391345253:report-group/webapp-*",
                "arn:aws:logs:ap-south-1:343391345253:log-group:/aws/codebuild/webapp",
                "arn:aws:logs:ap-south-1:343391345253:log-group:/aws/codebuild/webapp:*",
                "arn:aws:cloudfront::343391345253:distribution/ET5XFZER5THY",
                "arn:aws:s3:::webapp.hstart.in/*",
                "arn:aws:s3:::codepipeline-ap-south-1-*",
                "arn:aws:s3:::webapp.hstart.in"
            ]
        }
    ]
}
I just added "cloudfront:CreateInvalidation" permission to Action array, also added "arn:aws:cloudfront::343391345253:distribution/ET5XFZER5THY" to the resources object. Which is nothing but the resource arn for our cloudfront distribution.
Now every-time we release a change, codebuild will invalidate the cloudfront cache automatically, and we will be able to see latest website!
hardcoding your bucket name and distribution id isn't a good practice we can move those in to environment variables, new buildspec.yml file will look like this
version: 0.2

phases:
  install:
    runtime-versions:
      nodejs: 18 # Change this to match the version of Node.js you're using
  pre_build:
    commands:
      - npm install # Or any other command to install dependencies
  build:
    commands:
      - npm run build # Or any other command to build your static site assets
      - aws s3 sync ./dist/ s3://$S3_BUCKET --delete # Sync static site files to S3 bucket
  post_build:
    commands:
      - echo "Build completed successfully"
      - aws cloudfront create-invalidation --distribution-id $DISTRIBUTION_ID --paths '/*' #invalidate the given cloudfront distribution

artifacts:
  files:
    - "**/*"
we have two variables S3_BUCKET and DISTRIBUTION_ID let's define those in code build.
Navigate to codebuild, select our project "webapp" and click on edit, go to the section Environment and click on Additional configuration add your environment variables
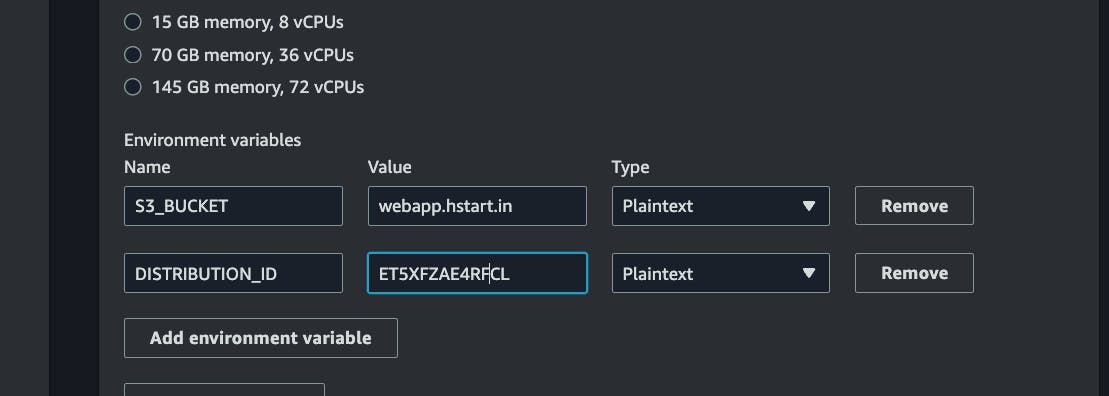
click on update project, we are good to go!
End Notes
I hope this article has been helpful for you guys.
There are more things to add like building and testing the code when a pull request is raised. To reduce the amount bugs gets into production, that's for another day.
If you guys have any doubts, feedbacks feel free to drop in the comments. Happy building 😊

